
Linksys SPA 1001 BYOD VoIP Settings & Configuration Guide
With BYOD option, inexpensive, easy to install and simple-to-use, the Linksys SPA-1001 VoIP adapter connects to your standard telephone and high-speed Internet enabling Internet phone service for your home.
STEP 1
You must first determine what IP address it received. To do this, you need to pick up the phone attached to the Line 1 jack and dial: **** (four asterisks)
then dial: 110 #
and you will be told the IP address of your device (e.g. 192.168.0.100)
STEP 2
Go to any browser equipped computer on your network and enter the address: http://<IP ADDRESS>/ where <IP ADDRESS>/ is replaced by the address that was given to you in STEP 1.
STEP 3
Click on the "Admin Login" button near the top right side of the screen, then click on the "Line 1" tab.

STEP 4
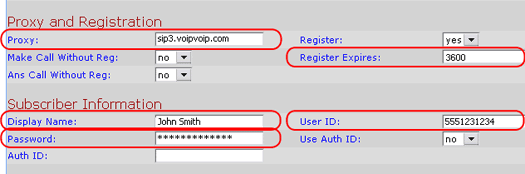
You need to modify only a few parameters from the factory default. They are listed here:
Proxy: sip3.Boloh.co.uk
Display Name: Enter your full name, this will show up as part of your caller ID.
User ID: Enter the account number assigned to you when signed up for Boloh service.
Password: Enter the password that you chose when you signed up for the service.
STEP 5
Click on the "Submit All Changes" button at the bottom of the form.
STEP 6
Change the “Preferred Codec” to G729a. Also change the “Use Pref Codec Only” to No.

STEP 7;
Click on the "Submit All Changes" button at the bottom of the form.
STEP 8
Make Calls!
Problems? Please check our installation troubleshooter.
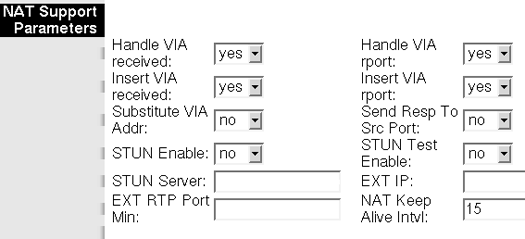
NAT/Firewall Issues
If you get one-way audio, you are probably behind NAT. Make the following changes on LINE 1 (you have to click on advanced view to see these options)

on the SIP menu;
If the phone fails to login, please take the time to double check your configuration as above. If everything appears to be correct, the problem may be your firewall.
- If your router/firewall suports DMZ, put your VoIP device in the DMZ area
- If you have an external firewall try opening SIP ports SIP signalling ports (UDP) = 5000 - 5500 RTP/RTCP ports (UDP) = 10000 - 30000
Still Problems? Please check our installation troubleshooter.;