Video Phone Grandstream GXV 3000 VoIP Configuration
 The Grandstream GXV-3000 Video Phone features an adjustable advanced VGA resolution camera sensor (with 1-touch ON/OFF switch for privacy control), a razor-thin 5"6-inch TFT color LCD with stunning picture quality (2-dimensionally rotatable to allow nearly all viewing angles), 5 navigation keys, 3 line indicators (each of which supports independent SIP account), visual voice/video message indicator, hands-free speakerphone with advanced acoustic echo cancellation, dual 10M/100M Ethernet ports (switch or router mode configurable), 2 USB ports, 2.5mm headset jack, and RCA style audio/video output jack to allow simultaneous video output to TV.
STEP 1
You must first determine what IP address it received.
By default, you will see this address on the LCD screen of the video phone.
STEP 2
Go to any browser equipped computer on your network and enter the address: http://<IP ADDRESS>/
<IP ADDRESS> is replaced by the address that was given to you in STEP 1.
STEP 3
You will be prompted to enter a password, the default is "admin", then cliche "Line 1" tab.
STEP 4
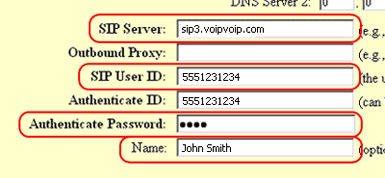
Go to ACCOUNT 1 tab. You need to modify only a few parameters from the factory default. They are listed here:
SIP Server: sip3.Boloh.co.uk
SIP User ID: Enter the account number assigned to you when signed up for Boloh service.
Authenticate ID:Enter the account number assigned to you when signed up for Boloh service.
Authenticate Password: Enter the password that you chose when you signed up for the service.
Name: Enter your full name, this will show up as part of your caller ID.

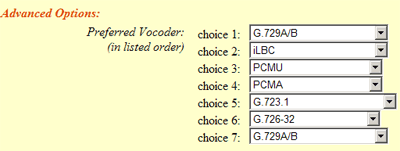
Advanced Options choice 1: Change preferred Vocoder to G.729A/B

SIP Registration: Yes

NAT Traversal: No

STEP 5
Click on the "Update" button at the bottom of the form.

STEP 6
Go to ADVANCED SETTINGS tab.Click on the "Update" button at the bottom of the form.
TFTP Server: Change upgrade via to TFTP; Firmware Server path to 168.75.215.189
STEP 7
Click on the "Update" button at the bottom of the form.

STEP 8
You will be brought to a confirmation screen on which you will click on the only option available: "Click to view your changes".
STEP 9
Click on the "Reboot" button at the bottom of the form.

STEP 10
Make Calls!
Problems? Please check our installation troubleshooter.
NAT/Firewall Issues
If you get one-way audio, you are probably behind NAT. Make the following changes and try again.
- If your router/firewall suports DMZ, put your VoIP device in the DMZ area
- If you have an external firewall try opening SIP ports SIP signalling ports (UDP) = 5000 - 5500 RTP/RTCP ports (UDP) = 10000 - 30000
Still Problems? Please check our installation troubleshooter.;

